Blog

Cooking Ee Fu Noodles: Culinary Adventure

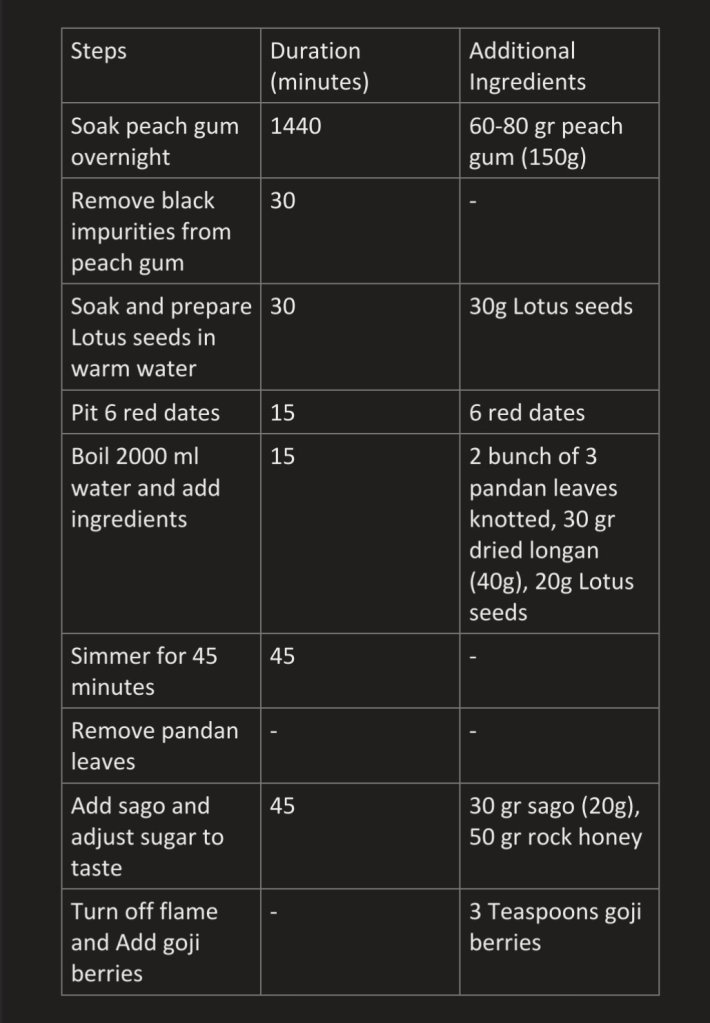
Welcome, dear readers, to a culinary expedition unlike any other. Today, we embark on a gastronomic journey to recreate the esteemed taste of Ee Fu Noodle in the comfort of our own kitchens. Prepare your taste buds, as we delve into the intricacies of this delectable dish.

Step 1: Gathering the Ingredients

Before we commence our culinary escapade, it is essential to assemble the necessary ingredients. The recipe calls for the following:

  • 2 cloves of garlic (known for their pungent aroma and vampire-repelling properties)
  • Pork (estimated cost: $3, though prices may vary depending on your locale)
  • Slices of carrot (for a splash of vibrant color and a hint of sweetness)
  • Shitake mushrooms (providing an earthy and savory element)
  • King oyster mushrooms (fit for royalty and adding a delightful chewiness)
  • Marinate the pork with the following: 1 tablespoon of teriyaki sauce, 1 tablespoon of rice wine, 1 tablespoon of flour, and half a tablespoon of oil (for an airtight pork-sealing operation)

Step 2: Noodle Preparation

In a pot of boiling water, gently immerse the Ee Fu noodles until they reach a state of tender perfection. Once cooked, drain them diligently and set them aside for the grand assembly.

Step 3: The Stir-Frying Begins

Heat two tablespoons of oil in a pan, allowing it to reach a sizzling crescendo. Into this aromatic symphony, introduce the garlic, letting it sizzle and release its flavorful notes. Stir for a brief moment, ensuring the garlic dances gracefully in the oil.

Step 4: The Pork’s Serenade

Now, it is time for the pork to take center stage. Add it to the pan, allowing it to showcase its culinary prowess. Stir-fry until the pork boasts a golden hue, exuding a tantalizing aroma that will make your taste buds tango.

Step 5: The Vegetable Ensemble

In this culinary orchestra, the carrot and mushrooms harmonize to create a melange of flavors. Add these vibrant ingredients to the pan, joining the pork in a delectable culinary pas de deux. Stir-fry until the vegetables achieve a delightful crispness, yet maintain their inherent freshness.

Step 6: A Momentary Reprieve

Set the pan aside for a brief intermission, allowing the flavors to mingle and the ingredients to exchange pleasantries. This respite prepares us for the grand finale—the magnificent fusion of noodles and vegetables.

Step 7: The Encore

In a new pan, we commence our second act. Add a tablespoon of oil, allowing it to coat the stage gracefully. Enter the chives and onion, sautéing them until they exude their aromatic symphony. Introduce the cooked Ee Fu noodles, tossing them gently as they absorb the scents and flavors.

Step 8: The Seasoning Symphony

To elevate this dish to new culinary heights, add the following seasonings to our performance: 1 tablespoon of oyster sauce (vegetarian or regular), 1 light soy sauce, 1 dark soy sauce, and 1 tablespoon of sesame oil. Allow these ingredients to dance upon the stage of flavors, mingling with the noodles and vegetables until a harmonious medley emerges.

Step 9: The Grand Finale

As the curtains draw to a close, we invite you to serve this masterpiece to a gathering of four to six fortunate diners. They shall marvel at the perfect balance of textures and flavors, a testament to your culinary prowess.

Conversion Chart:
1 tablespoon = approximately 15 mL

And there we have it, dear readers! A whimsical guide to recreating the flavors of the illustrious Ee Fu Noodle restaurant. Remember, cooking is an adventure that allows us to explore the depths of our culinary imagination. Bon appétit, and may your taste buds revel in the flavors of this delightful dish!

Peach gum recipe for 8 to 10 (15 pax)

Before you start your own weekend torture session, let me tell you a little bit about this magical ingredient. Peach gum, also known as “tree tears,” is a sap that oozes out of the trunk of the Chinese peach tree. It’s been used in traditional Chinese medicine for centuries to boost immunity, improve skin and even make you look ten years younger (well, maybe not that last one but I can dream).

But let’s be real, the real reason you’re here is because you want to know how to make that delicious peach gum dessert that’s been taking Instagram by storm.

First things first, you’ll need to gather your ingredients. And I mean gather, because this recipe is like a scavenger hunt for obscure ingredients.

  1. 60-80 gr peach gum (150g)
  2. 2 bunch of pandan leaves knotted
  3. 6 red dates
  4. 2000 ml water
  5. 50 gr rock honey sugar adjust to your taste
  6. 30 gr dried longan (40g)
  7. Lotus seeds soak in warm water and never cold (add after soaking 30 minutes )
  8. 30 gr sago (20 g)
  9. 3 Teaspoons goji berries (final)

Then Saturday night, I set off to prepare the peach gums in water for 8 hours. Then follow the project management plan to make the dessert.

Soaking 150 g is too much, but it produces a bunch

*Footnote: Peach gum, known as a natural gum exudate secreted from a peach tree (Prunus persica), is a vital part of the tree’s defense system. As the tree is exposed to various environmental factors such as pests, diseases, and weather conditions, it secretes a thick resin-like substance to protect itself. This substance, known as peach gum, often contains impurities such as bark, dust, and other debris. Therefore, it is essential to remove these impurities before cooking to ensure a pure and smooth final product.

Inside out crab stick Uramaki sushi

This is today’s challenge: hunt for the ingredients, make rice and prepare sushi

Ingredients

  • 3 cup 540ml rice : 600 ml water: vinegar 60ml
  • 600 ml (approximately 1:1.2) ml water:
  • vinegar 60 ml (after sitting cooked rice for 15 mins)
  • Sesame

Dressing

  • mayonnaise

Fillings

  • 125 g Crab stick (defrost the day before)
  • 10 pieces of nori a.k.a Seaweed

For Japanese short grain rice, the ratio of rice to water is 1:1.1 or 1:1.2

To adjust portion

1 cup 180ml rice : 216 ml water for two bowls 330g rice

2 cup 360ml rice : 432 ml water

3 cup 540ml rice : 600 ml water: vinegar 60ml

Add one postcard size kombu to release flavour

Procedure (shortest ever)

  1. Rinse the rice to clear off the starch and drain all water (recycle those water to feed plants)
  2. Add 600 ml of water and Soak for 30 minutes
  3. Prepare crab sticks and wash them
  4. cook rice in the rice cooker
  5. place crab sticks on a metal plate and place inside rice cooker as it cook
  6. Once cooked rest for 15 minuted, place rice onto a bowl
  7. Add 60 ml vinegar and some sesame seeds into rice
  8. Prepare fillings by mixing tuna or crab sticks with mayonnaise
  9. Lay down the seaweed onto rolling Mat
  10. spread rice on top of seaweed
  11. Sprinkle Furikake, (rice Seasoning) flake on rice and flip over
  12. Add mayonnaise & fillings at 1/3 along seaweed and roll them
  13. Cut the roll
  14. Serve

Starting Hydroponics in SG

Hello and welcome to my little home in sunny Singapore, the little red dot!

Now, I know what you’re thinking. “zzz, what on earth are you doing with all these plants in your tiny apartment?” Well, I’ll tell you. It all started when covid hits singapore, this beautiful city, and I realised that finding fresh, locally grown produce was a bit of a challenge. And to makes things worse we are in a lock down.

So, I decided to take matters into my own hands and start growing my own vegetables and herbs. And let me tell you, it’s been a journey. I’ve had to learn about pH levels, nutrient solutions, and all sorts of technical jargon. But it’s been worth it, because now I have a steady supply of fresh greens right in my own home.

https://mycollection.shop/zengarden

And the best part is, I can do it all without using any soil! That’s right, this is hydroponics. It’s a way of growing plants using water and nutrients instead of soil. And let me tell you, it’s a game-changer. No more dirt under my nails, no more mud, and most importantly, fresh from the balcony.

Cucumbers

So, now that I’ve told you all about how I got into hydroponics, let me show you where I do all my growing. As you can see, I don’t have a ton of space to work with. But with a little bit of creativity, I’ve managed to turn this tiny corner of my apartment into a mini farm!

Up here, I have a mix of veg like kale, and bak choy. They’re super easy to grow and they are fresh.

Over here, I have my leafy greens. Kale and spinach are my go-to’s, because they grow really quickly and they’re packed with nutrients. Plus, they’re perfect for salads, sandwiches, and all sorts of other dishes.

And finally, I have my chilli and tomatoes. They’re a bit more challenging to grow, but the payoff is worth it. Freshly picked chillis and peppers are so much sweeter and juicier than the ones you get at the store.

Peppers and tomatoes

That’s how I started hydroponics in the little red dot. If you’re interested in giving it a go yourself, there are tons of resources out there to help you get started. And who knows, maybe you’ll end up with your own little indoor farm like me!

To reduce your hassle on visiting stores, I’ll put links to what I’ve commonly purchase

https://mycollection.shop/zengarden

Tony Romas BBQ wings

Sprinkle with parsley

Ingredients

  • 2 kg chicken wings. separated into wingettes and drumettes
  • 2 Tbsp baking powder (DO NOT USE BAKING SODA!)
  • No salt if bbq sauce is salty
  • Specially ingredient- 1 tablespoon ginger juice
  • 1 cup BBQ sauce (your favorite BBQ sauce)
  • 3 garlic cloves (minced)
  • Pinch of parsley

Used plastic as gloves

Instructions

  • Meanwhile, prepare the sauce by combining the hot sauce, the BBQ sauce and the minced garlic in a large bowl. Add a tablespoon of ginger
  • Marinate the chicken wings. Pat dry chicken wings completely with a paper towel before adding seasoning. Place the wings in a large bowl. Add the baking powder, salt and pepper. Mix by hand until all wings are evenly coated. Spread the wings on the baking sheet. Do it for four hours or overnight
  • You must use a convection function in your oven for this recipe. Set the rack to middle position. Preheat oven to 220C.
  • Line a baking sheet with foil, This is to prevent messy burnt on your pan & easy washing later on then banana leaves because I don’t want direct contact with aluminium which can cause Healy issues. Set aside.
  • Arrange the seasoned chicken wings on the rack in one layer. And bake at 220C convection for 20 minutes.
  • Turn the wings halfway. Turning the wings halfway when baking in the oven will ensure even cooking. Scoop the leftover bbq sauce onto the chicken
  • And bake at 220C convection for another 20 minutes.
  • So spend 40 minutes total — 20 minutes on each side.
  • Sprinkle with parsley

Snapdragon in Singapore boca de dragón”

A few years ago, I’ve received a give from my sister. It’s the seeds of boca de dragón

My covid insulation turned consolation

There are multiple species of flowers in the world. I planted these in water for a long time. It died many times over, finally the flowers bloomed. They looked to me like orchids but actually resembles dragon. There are interesting stories about this plant. How they look like skulls.

Little wonder, then, that ancient cultures held the snapdragon to possess supernatural powers. They were thought to offer protection from deceit, curses and witchcraft if they were planted in your garden. Another myth maintains that they are able to restore youthfulness and beauty to any woman who ate them. It’s a wonder that the witches didn’t raid the gardens in which they grew to repair their own ravaged features.

https://www.kuriositas.com/2013/07/the-dragons-skull-macabre-appearance-of.html?m=1

Grow this, not that

As I was browsing the plant section of the a chill store, a plant caught my sight. It was like love at first sight.

I started to find out more about this. And even decided to plant from seed. This is known as the asparagus fern. It is beautiful, soft and furry. Don’t give it too much water for it may drown. Same as other ferns, you have to mist it.

Then one day, I saw a store selling the plant at lesser costs. So I bought it home and repot that into the pot I bought.

Asparagus fern

Peach gum with green bean

  1. 180g green beans
  2. 1800ml water
  3. Few Pandan leaves
  4. 70g honey rock sugar
  5. 30 g of peach gum
  6. 80 g of sago

Prepare

  1. Wash and soak peach gum overnight
  2. Next morning, Wash and soak green bean for minimum an hour
  3. pick out the black impurities from peach gum

Procedures

  • Boil 1800 ml of water with green bean
  • Place Pandan leaves if you planted them
  • Simmer green beans until it soften
  • Add in sago, honey rock sugar
  • Then add the peach gum

How many servings to consume?

Australian food guide poster

After a couple of weeks, my light green bok choy crowd the small hydroponics pot I’ve made from recycle jug. Using the same 2 liter jug, I made 7 holes to hole to hold these veggies. These should be for a few servings for one day one person.

Huang Jing Pak Choi (Chinese Cabbage)